Saturday, December 8, 2018

Update on the project

It's been 9 months or so since I posted an update.  And honestly, this summer the progress has been slow and intermittent.  My "little" brother Troy just bought a 1970 Camaro today, so that will help my motivation!

So, here's what things look like now:

Installed the P/S pump, it was weird, I know I removed the thing in a operational state, but I couldn't get it back in!  So I bought a new bracket from Allen Grove that makes it all work better than before.


An oddity of my install, is the distributor:  a Crane Cams distributor with several built in advance curves that are selected by a switch on the housing.  They don't make these anymore, so hopefully it works and I don't have to drop 200-300 on another one.


Another recent addition is the Champion radiator I purchased from Jegs.  Hopefully things will run cool.  Later on, I probably will add an electric fan system.  Gotta get the thing on the road for now, so work on that later.


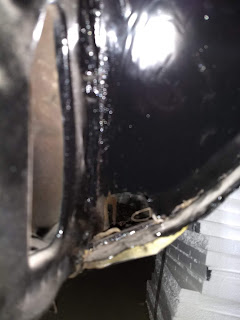
This is the leading edge (by front fender mount) of the driver side rocker panel area.  This is one of the few rusty parts on the car.  I already gouged most of it out, but I will be revisiting this later to make sure there aren't any future rust issues.


Another view.

Wednesday, March 14, 2018

Attaching the headers -- I didn't have any idea it would be so difficult!


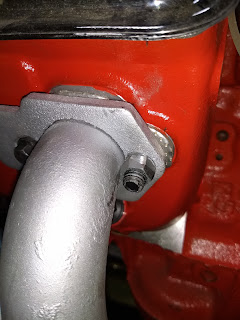
Over the last week or so, I've struggled to get my headers mounted.  These are the same headers as were on the car before I decided to tear into it, but the heads are new aluminum heads from Summit Racing.  I had some 3/8" hex head bolts from Milodon as I recall.  The bolts interfere with the radius of the header exiting the head.  I scared myself several times as the bolts tended to cross-thread.  I finally got the passenger side head bolted up, and went to the driver side.  As it turned out, this side was impossible without damaging the threads in the head.  So I thought I'd try studs.  The ARP stud kit went for $50 to $100!  So I finally ended up with the $30 Mr. Gasket kit.  And I immediately saw a problem with the size of the nuts.  The heads were 9/16" with a "built in" washer that was even wider.  These nuts would be physically impossible to install without grinding holes in the primary header pipes.  I determined that I needed to use 2 studs, and used the bolts on the rest.  I ground the hex down from 9/16" (14.3 mm) nuts down to 12 mm (.47", almost 1/2").  It was still difficult to get them started but I was able to get the header mated up to the head.  Whew!  Another part of the project that ought to be easy, but turned out difficult.

Comparing the Mr Gasket stud with the 3/8" head header bolts I already had

Hooray! Finally installed.

Close view of my "hacked" Mr. Gasket 12 mm nut


Mr. Gasket header stud kit showing the included nut compared to a typical sized 9/16" nut


Wednesday, March 7, 2018

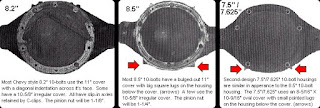
In 1971, the 12 bolt rear end was no longer available on any Camaro.  Two versions of the 10 bolt were available.  The 8.2" and the 8.5" rear end.  It is easy to tell the difference between the 12 bolt and the 10 bolt rear ends as they had 12 and 10 bolts on the differential cover.  But the two 10 bolt rear ends are the same in that regard.

I found information and this image on the Internet, so of course you can be assured of it's correctness:


It seems that the 1971 Camaro may have either the 8.2 or the 8.5, perhaps to consume the inventory of the 8.2 rear ends.  It appears as though I have the stronger 8.5" 10 bolt (note the ears on the bottom sides of the differential).  The gearing is 4.10:1 and it has a POSI unit (I think the POSI is an aftermarket piece.


Friday, March 2, 2018

Which looks cooler?

The split bumper Rally Sport (RS) Camaro or the full width front bumper on the standard model?


Above is my Camaro (when I first bought it, and it wasn't in pieces in my garage)


Here is the RS style of the same year, etc.  Notice it has a split bumper as well as different turn signal/driving lights.  The RS style was produced in a much smaller number than the standard style.  In fact, about 16% of the 114,630 Camaros produced in 1971 had the RS style.  About 7% of Camaros included the SS package, and only 4% were ordered with the Z/28 package.  The RS style could also be ordered as a Sports Coupe, SS or Z/28

Some people half-way change to a RS style, they change the actual chrome bumper, but the underlying pieces, including a different nose and grill are left as before.  This is an example:


I think they all look great.  I prefer the "true" RS styling by a small margin.  I don't really like the "Half RS" as much.  One reason is they don't have any protection for the nose.  The correct RS nose is "endura" dent resistant material.  It is engineered for absorbing a small bump, while the split bumper Camaro nose has no protection whatsoever.

So, to help with the full RS treatment, a few aftermarket suppliers provide a full kit to make things easier.  The kit goes for a little less than $2500.  www.ss396.com is an example.  I don't believe I will initially "upgrade" to the RS front, but maybe after my car is roadworthy as a new project.

Monday, August 29, 2016

Tonight I passed a milestone: the Camaro is off jack stands and on its own 4 tires.

I assembled the front end, then had to get all the nuts torked down properly, and install pins

Added the front brakes


Bolted on the front wheels

Off the jack stands!

After the Camaro was up on the jack stands for so long, I forgot that the Camaro has a pretty low slung look, which you can already see before the engine and trans go in.

Next on the schedule, is to bolt in the engine and transmission.  It will be good to clear the floor of the garage a little.

The end of July and August I was getting pretty dedicated to working on the Camaro.  Here's what I was working on:

The radiator support has some rust (from the battery)

I used some real craftsmanship to get the springs compressed (the spring compression tool I borrowed wasn't quite enough)


Finally did get the springs in there!


Tuesday, July 26, 2016

Progress is steady with my 1971 Camaro Sport Coupe


  • Remove, clean, paint the front subframe
  • Repaired mounting holes damaged from rust
  • Remount the subframe using Global West mounts
  • Lots of other stuff!


I am really excited about my progress.  The project is daunting but it doesn't seem as remote as it once seemed.